Tomorrow is my monthly MOPS group meeting. I am enjoying having a reason to get out of the house to do something other than grocery shopping or running other errands. It even gives me an excuse to dress up a little and wear make-up (which I usually only do on Sundays or if Ande and I are going out somewhere). For this meeting, we're having a cookie exchange, where the participants each bring 3 dozen cookies to trade with each other. I didn't really feel like baking cookies, and I didn't want to go store-bought (not that there's anything wrong with store-bought cookies. Especially Pepperidge Farms.) I decided to, instead of making cookies, make Buckeyes. They're one of my favorite Christmas traditions. I remember watching my mom baking cookies and making such sweet delights as Divinity, Pecan Tarts, and of course Buckeyes. She only did this at Christmas, so it was a special treat. I thought I'd share the process with you, my faithful readers. I wanted to mix it up a bit, and thought I'd try to post the recipe A la Pioneer Woman. Now, I'm not nearly as entertaining to read as her, but I'll try my best. Enjoy!
When Pioneer Woman posts recipes, she also posts pictures and funny tips. Not that this recipe is all that complicated, but I thought I'd channel a little P Dub and do that myself. Please note, this Buckeye recipe is slightly different than Shelly's (which I'm sure is delicious, too. This is just the recipe I grew up with).
Mmmmm....Buckeyes. They're YUMMY. Not the Ohio State Buckeyes. Not the "hairless nuts with no commercial value" buckeyes. Peanut-buttery-chocolate-coveredy (yes, I did just make that word up, thanks for noticing) little round bits of heaven is what I'm talkin' about here!
Here's what you start with:
THE RECIPE

12 oz Creamy Peanut Butter
3/4 Cup Butter, softened (not melted)
1 tsp. Vanilla (I use Pure Vanilla Extract, because it tastes better)
1 LB Powdered (Confectioner's) Sugar
1 oz Paraffin Wax (Which is NOT located in the baking aisle. You can find it where you'd find the canning supplies) It sounds weird, but don't leave it out. Trust me.
12 oz Semi-Sweet Chocolate Chips
(Please note, I made a double batch, which gave me about 8 dozen Buckeyes - this recipe should give you around 4 dozen or so)

STEP ONE:
Combine first four ingredients in a large bowl. Here's the peanut butter - I weighed it to make sure I had the right amount.


The butter (well, I used margarine, but butter would work too)


The vanilla (OH MY WORD do I ever LOVE the smell of vanilla extract!)

 And the powdered sugar. I really could have used a larger bowl...

STEP TWO:
Knead the ingredients with your hands thoroughly. It's pretty sticky at first, but after a few minutes it will turn into a large ball of dough. I would have taken a picture of the kneading process, but I would have needed an extra hand to do so, since both of my hands were covered in peanut butter...which is not very good for holding and/or operating a camera.

STEP THREE:
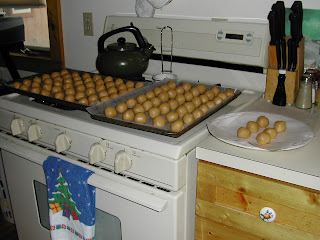
Roll dough into small balls. I usually just grab a bit of dough and roll it between my hands until it forms a nice little ball. You could make them a little bigger or smaller if you wanted. Place the doughballs onto a cookie sheet lined with waxed paper.


STEP FOUR:
Refrigerate for one hour. If your fridge is like mine, you have no room to do that. I've got a side-by-side that doesn't really hold as much as I'd like. Of course, if I got rid of some of the science projects I'm certain are residing in the back of the fridge, I probably would have room. BUT, I live in Michigan where it's cold. So, if you live in a cold climate like me, you can use what I like to call the Redneck Refrigerator. My dough is currently resting (covered) on my porch, because it's currently 37 degrees F(feels like 29) outside. If you don't have cold enough weather to do that, then I guess you'd better get in the kitchen and clean out your refrigerator!
 After your hour is up, take the paraffin wax and chocolate chips and heat over low heat until melted.


Make sure you stir the paraffin and chocolate chips while they are melting.


 Once the chocolate is nice and smooth, you're ready to dip the dough balls. Using a toothpick inserted into the center, lower the dough ball down into the chocolate and cover all but the top.

 Place the chocolate covered dough balls on waxed paper to cool.
 Now, I don't like the toothpick holes in the tops of my buckeyes. So I set one doughball aside. Pinching tiny bits of dough off, I was able to "fill in" the holes. You can see at the top of the following picture how much better it looks with the holes filled in. However, you don't HAVE to do that if you don't want to.
Let the buckeyes cool completely, then store tightly covered in a cool place. (Mine will be returning to the Redneck Refrigerator!!)
 So, I hope you've enjoyed the tutorial. If you make these, leave me a comment and let me know how they turned out!!


